 A comments section implemented with google sheets/forms
During my latest redesign of my website, I explored Static Site Generators and ended up using eleventy. Contrary to popular belief, a static website doesn’t mean that you must give up on all the fun that dynamic pages provide. In this article, I will talk about how I added a comments section to my blog posts using free google services (forms, sheets and firebase).
The path to implementing comments in an eleventy blog includes using google forms to collect comment responses which are in google sheets. I chose firebase for authentication as it is very straightforward to implement it..
To start things off, let us set up google forms with the required fields. The fields that we will be needing are a post identifier, commenter’s name, the content of the comment and the email address provided by firebase authentication. We will be using the article url as the post identifier. Create a new form with the fields.
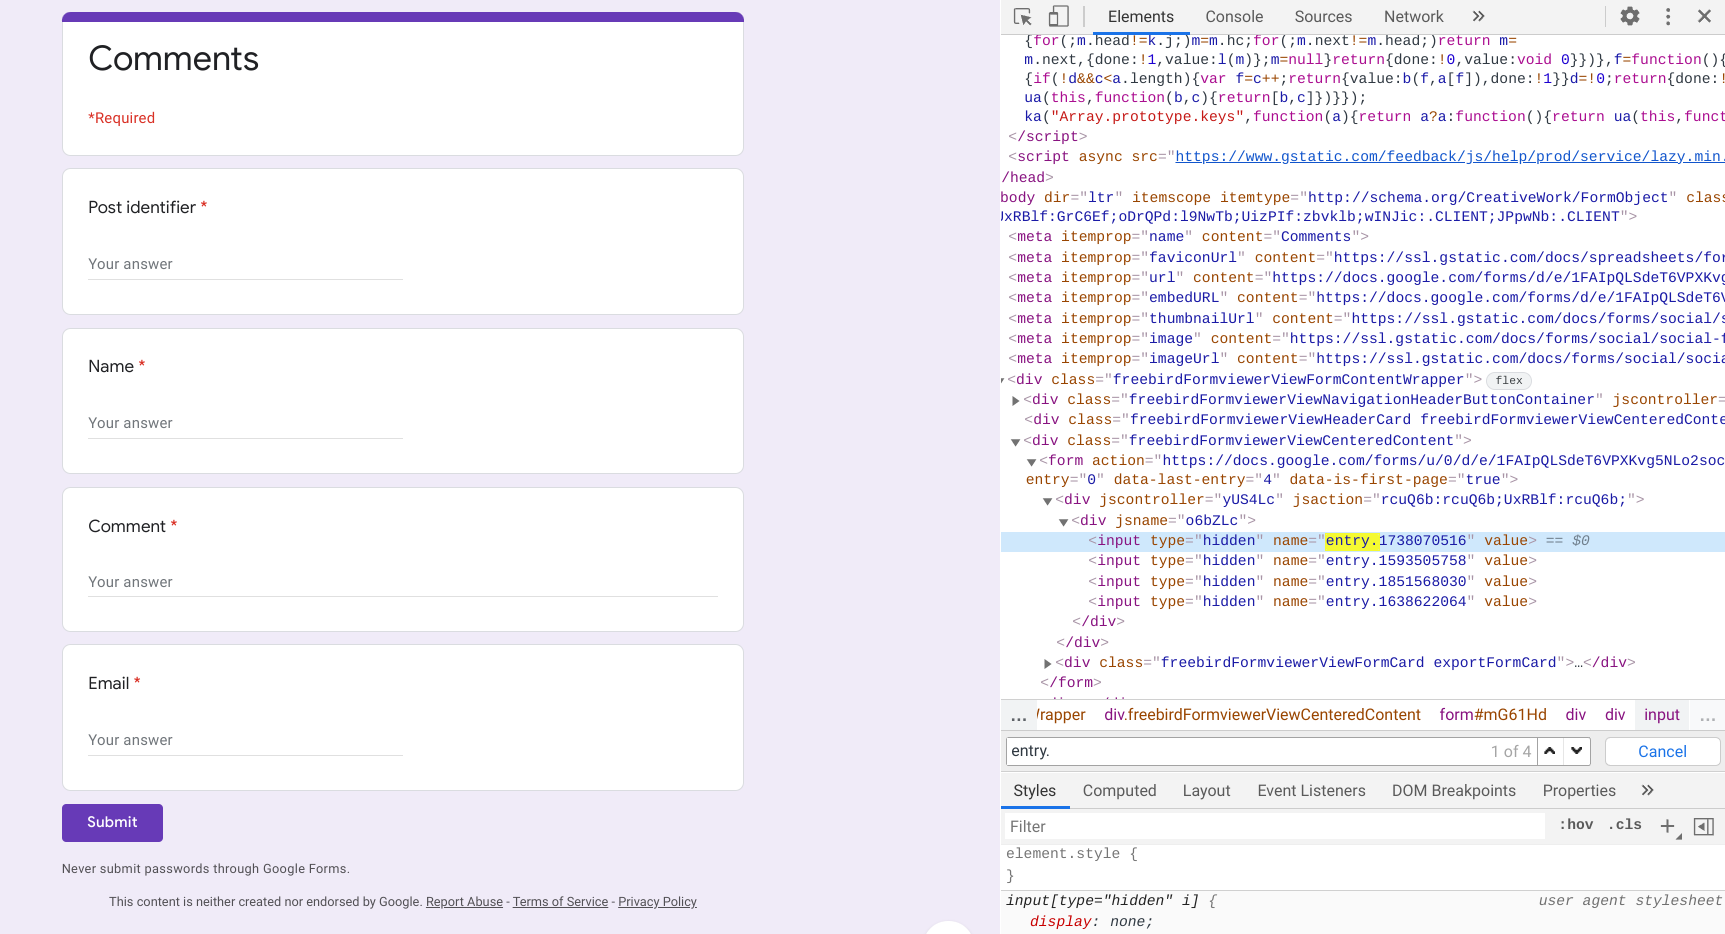
Open up the form in preview mode (use the eye icon) and then open developer console. Now we will note down the unique name attribute for each of the fields. To do this, in the elements tab of the developer console search for “entry.”. This will show us 4 entries. They are the name attributes that we must use in our form while submitting from our blog post, so note them down. The order is the same order of our fields. We also need to note down the url for the action attribute of the form.
 Google forms with required field
Now that the google form is set up, it is time to link it to a google sheet.Go into the responses tab of the form and attach it to a spreadsheet. Open up the spreadsheet and add an extra field called isAuthor. This field is never filled up by the form, we will use an ArrayFunction to fill it up as the data arrives. The sheet should be publicly viewable but not editable. Set the permissions in link sharing and save the url as it will be required later.
Now let us add a couple of formulas and formatting. First, let us set “Timestamp” field formatting to mm-dd-yy. Select the entire column A, then Format => Number => More Formats. => More date and time formats. Create a mm-dd-yy format. You can add a timestamp after the date if you prefer but it will not be used by the comments. Now it is time to use the magical ArrayFunction in the isAuthor column. The isAuthor provides us a boolean value of whether the commenter is the author by comparing the email address field. Insert the following formula in F2.
=ArrayFormula(ISNUMBER(SEARCH("<insert email address>", $E$2:E))) Google sheets with formula
Let us set up firebase authentication using google as an auth provider. Create a new project in the firebase console and add a web app. Once the app is added, copy the setup code it provides. In the authentication section enable the required auth provider in the authentication tab under sign-in method tab.
We are all set to dive into the eleventy and create the comments section. First create two new template names “comments.njk” and “firebase.njk”. The comments.njk file will contain the code for specific implementation of comments and firebase.njk will contain the code concerned with authentication of the user. Let us also add some data to our data file which I have named “site.json” in _data folder. This is where we will add all the links and name attributes we saved earlier. The name attributes we saved go in the postFields object
_data/site.json
{
	……,
	“comments”: {
		“readUrl”: “<insert the google sheets link>”,
		“postUrl”: “<insert google form action link>”,
		“postFields”: [ <post identifier>,
				<name>,
				<content>,
				<email>
				]
	}
}
Let us begin with the firebase code. Remember to insert the firebase setup code that we copied earlier at the top of the file. We initially set up the authentication provider project. The authenticate() function is used to initiate the google auth on a button click. The onAuthStateChanged() function allows us to perform actions when the state of user login changes
firebase.njk
/*
****************************************
INSERT FIREBASE SETUP CODE
****************************************
*/
<script>
// Start a sign in process for an unauthenticated user.
var provider = new firebase.auth.GoogleAuthProvider()
provider.addScope('profile')
provider.addScope('email')
firebase.auth().signInWithRedirect(provider)
}
function authenticate() {
firebase.auth().getRedirectResult().then(function(result) {
  if (result.credential) {
    var token = result.credential.accessToken
  }
  var user = result.user
})
  firebase.auth().onAuthStateChanged(function(user) {
  if (user) {
    document.getElementById('auth').style.display = 'none'
    document.getElementById('comments-form').style.display = 'block'
    let name = document.getElementById("name")
    name.innerText = user.displayName
    let image = document.getElementById("image")
    image.src = user.photoURL
  } else {
    console.log("not logged in")
    document.getElementById('auth').style.display = ''”
    document.getElementById('comments-form').style.display = 'none'
  }
})
function signOut() {
  firebase.auth().signOut()
}
</script>
The important part of implementing the UI is done in the “comments.njk” file. Let us begin by defining the html structure and CSS. A basic explanation of the structure is that we have a div that shows when there are no comments on that particular article. Then we have an auth and form component whose visibility depends on the auth state. Three of the form fields are hidden as the will be filled automatically from the user authentication and page url. Pleae not that the entire CSS is not attached here and also replace the variables with required values. The "google.njk" is a google icon svg.
comments.njk
<h2 class="post-subtitle">Comments</h3>
<div id="commentSection" class="comments">
        <div id="no-comments" class="post-info no-comments">
                <p>There are currently no comments on this article, be the first to add one below!</p>
        </div>
</div>
<h3 class="post-subtitle">Add a Comment</h3>
    <div id="auth" style="display:none;">
        <div class="post-info">
        You must authenticate with google in order to post comments.
    </div>
    <button class="google-button" onclick="authenticate()"><div class="d-flex" style="justify-content:center;align-items:center;">
    {% include 'icons/google.njk' %} Authenticate with Google
    </div>
    </button>
    </div>
<div class="comments" id="comments-form">
        <div id="user" class="user">
            <img class="image" id="image">
            <span class="name" id="name"></span>
            <button class="button" id="button" onclick="signOut()">Sign Out</button>
        </div>
                <form onsubmit="return checkform()" action="https://docs.google.com/forms/u/0/d/e/1FAIpQLSdeT6VPXKvg5NLo2socJFISOGxkENzV3b1vYacoK8xr-ns7Lg/formResponse" target="comments_hidden_iframe" id="comment-form" autocomplete="off">
                <input name="{{site.comments.postFields[0]}}" type="text" value="{{page.url}}" style="display:none">
                <input name="{{site.comments.postFields[3]}}" type="text" id="email" style="display:none">
                <input name="{{site.comments.postFields[1]}}" type="text" id="userName" style="display:none">
                <div class="group" style="flex-grow:1;">
                                    <textarea id="comment-content" maxlength=140 name="{{site.comments.postFields[2]}}" form="comment-form" required=""></textarea>
                    <span class="bar"></span>
                    <label>Type in your comment</label>
                </div>
                                <input id="comment-submit" class="submitButton" type="submit" value="Post">
                </form>
</div>
<iframe name="comments_hidden_iframe" id="comments_hidden_iframe" style="display:none;"></iframe>


<style>
.comments {
    margin-bottom: 2rem;
}
.no-comments {
    display: none;
}
.post-info {
    color: var(--color-text-offset);
}
.show {
    display: block;
}
.comment-name {
    font-size: 1.25rem;
    padding-right: 0.25rem;
    font-weight: 400;
}
.author-tag {
    color: var(--color-primary);
}
.comment-date {
    color: var(--color-text-offset);
    font-size: 0.8rem;
}
.comment-item {
    padding: 1rem;
    margin-bottom: 1rem;
    background: var(--color-bg-offset);
    animation: fadeInUp 0.5s ease;
}
.google-button {
    padding: 0.5rem;
    font-size: 1.125rem;
    width: 100%;
    background: transparent;
      outline: var(--color-secondary);
      border: 1px solid var(--color-secondary);
      color: var(--color-text);
}
.google-button svg {
    height: 2rem;
    padding-right: 1rem;
}
.google-button:hover {
    color: var(--color-secondary);
    background: var(--color-bg-offset);
}
.user {
    display: flex;
    justify-content: center;
    align-items: center;
}
.user .image {
    width: 3rem;
    height: auto;
    border-radius: 50%;
    overflow: hidden;
}
.user .name {
    flex-grow: 1;
    padding-left: 1rem;
}
.user .button {
    background: transparent;
    border: 1px solid var(--color-primary);
    color: var(--color-primary);
    padding: 0.5rem;
}
.user .button:hover {
    background: var(--color-primary);
    color: var(--color-bg);
}
</style>
The iframe tag is added to avoid the page refresh when the form is submitted. Once we add javascript in the next step, the comments component will function as follows.
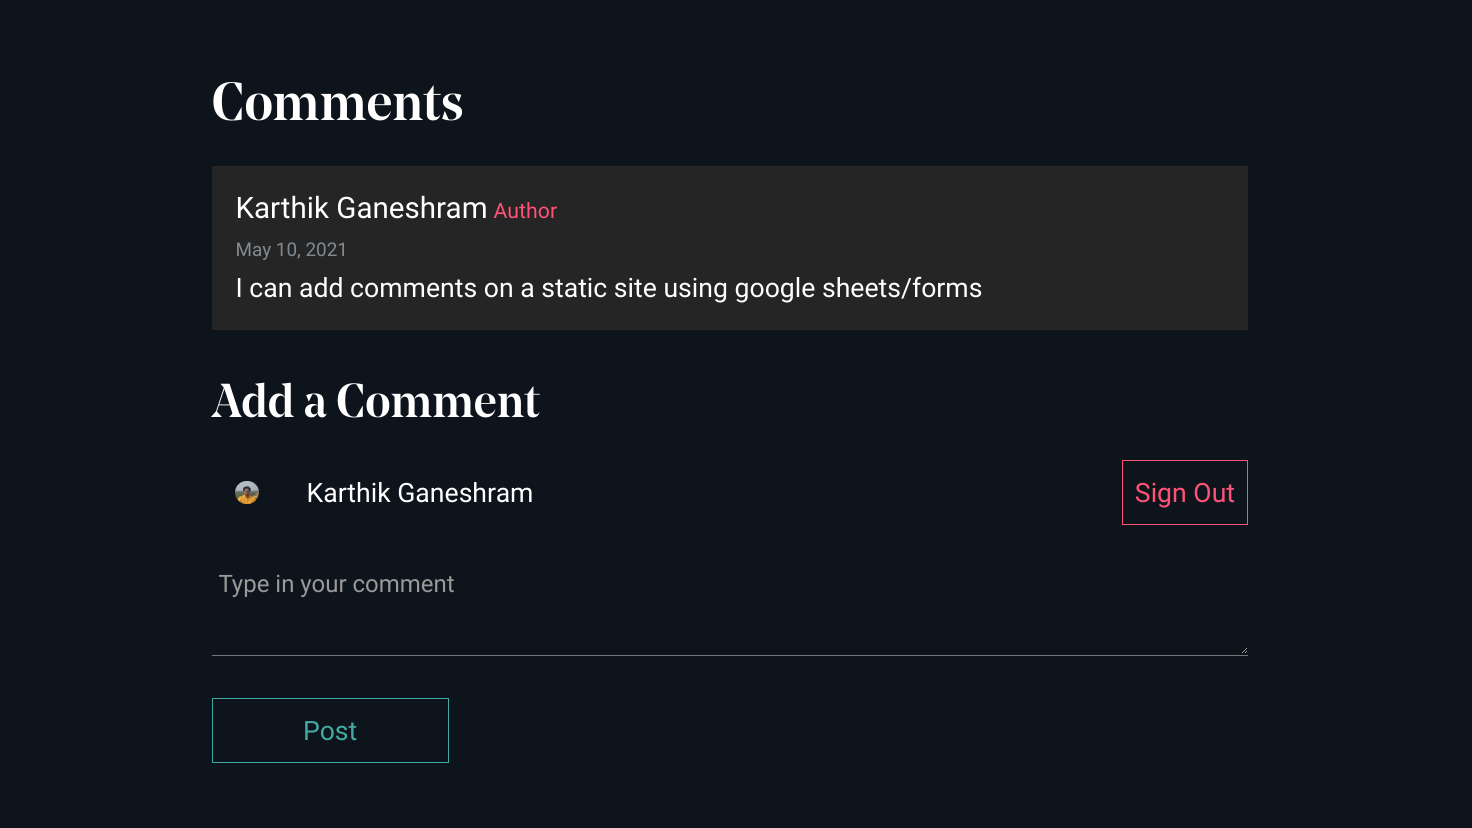
If the user is logged in, then the comment form will be visible along with the user profile and an option to sign out
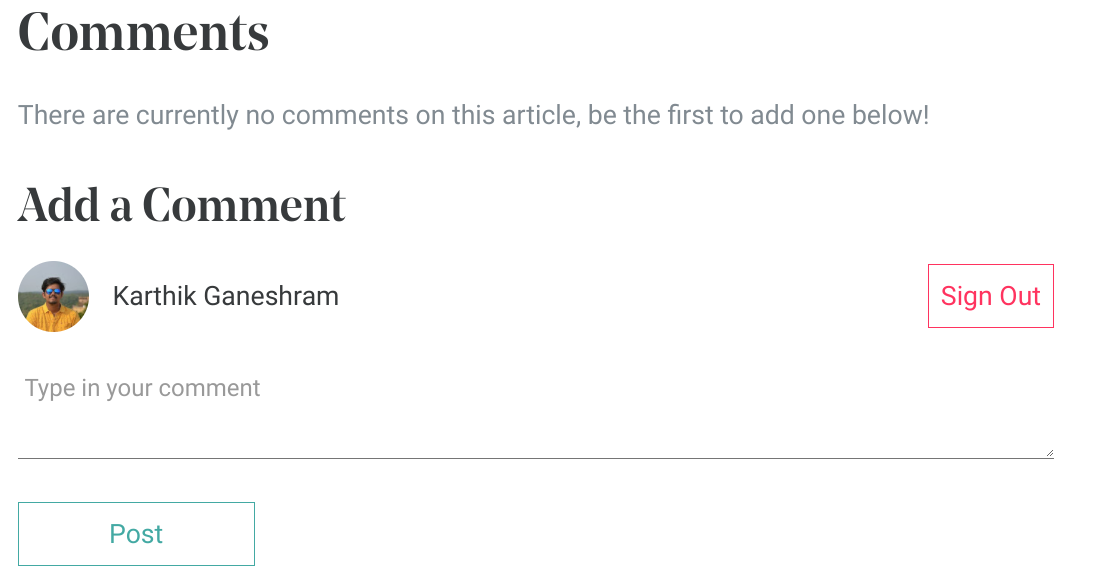 Comments section with user logged in
If the user is not logged in, then the form is hidden away and the user has the option to sign in with google to login.
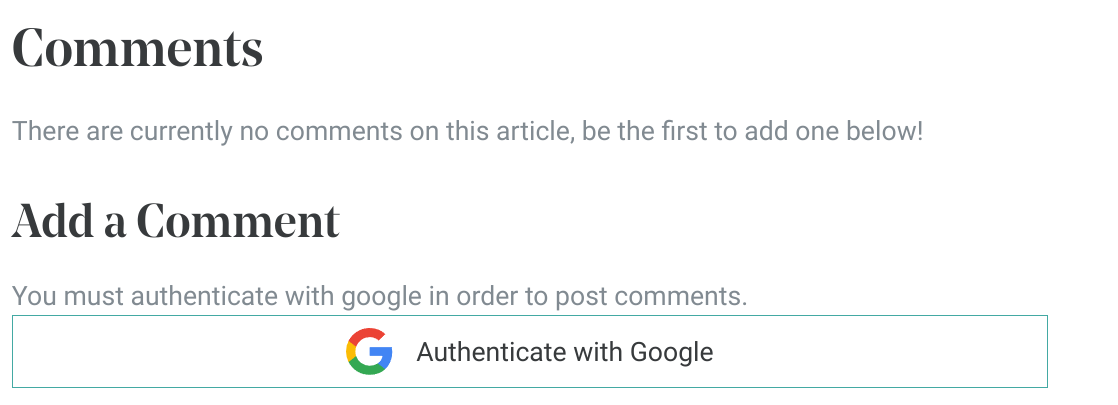 Comments section with user logged out
We are almost at the end. The final ingredient is the javascript logic. The loadComments() makes a request to the sheet document with that particular page url and gets the comments that belong to it. The displayComments() parses the csv that is returned and displays it by creating new elements for each comment. The checkForm() is used to verify if the user is signed in before submitting the comment. Once a new comment is submitted, the comments are reloaded and only new one are rendered.
comments.njk
<script>
let months = ["Jan", "Feb", "Mar", "Apr", "May", "Jun", "Jul", "Aug", "Sep", "Oct", "Nov", "Dec"]
let noComments = document.getElementById("no-comments")
let commentSection = document.getElementById("commentSection")
let pageUrl = "{{ page.url }}"
let visibleComments = []
function formatDate(value) {
return months[new Date(value).getMonth()] + " " + new Date(value).getDate() + ", " + (new Date(value).getYear() + 1900)
}
function encodeHTML(s) {
return s.replace(/&/g, '&').replace(/</g, '<').replace(/"/g, '"')
}
function encodeFormData(data) {
return Object.keys(data).map(k => encodeURIComponent(k) + '=' + encodeURIComponent(data[k])).join('&')
}
function displayComments(comments) {
if (comments == null || comments == "") {
if (visibleComments.length == 0) {
noComments.classList.add("show")
return
}
}
console.log(comments)
comments = comments.replace(/"/g,"")
let commentList = comments.split("\n")
commentList = commentList.map(function(k) {
let temp = k.split(",")
formatDate(temp[0])
temp[3] = (temp[3] == "TRUE" ? true : false)
return temp
})
commentList.forEach(function(element) {
if (visibleComments.includes(JSON.stringify(element))) {
return;
}
let authorTag = element[3] ? true : false
let item = document.createElement("div")
item.className = "comment-item"
let title = document.createElement("div")
title.className = "comment-title"
let titleText = encodeHTML(element[1])
let name = document.createElement("span")
let date = document.createElement("div")
date.className = "comment-date"
name.className = "comment-name"
date.append(formatDate(element[0]))
name.append(titleText)
title.append(name)
if (authorTag) {
let author = document.createElement("small")
author.className = "author-tag"
author.innerText = "Author"
title.append(author)
}
title.append(date)
let comment = document.createElement("div")
comment.className = "comment-content"
let commentText = encodeHTML(element[2].replace(new RegExp('\r?\n','g'), '<br />'))
comment.append(commentText)
item.append(title)
item.append(comment)
commentSection.append(item)
visibleComments.push(JSON.stringify(element))
noComments.classList.remove("show")
})
}
function loadComments() {
var sqlQuery = encodeURIComponent(`SELECT A, C,D, F WHERE B ="${pageUrl}"`)
fetch (`{{site.comments.readUrl}}/gviz/tq?tqx=out:csv&sheet=comments&tq=${sqlQuery}&headers=0`)
.then(response => response.text())
.then(response => displayComments(response))
}
let commentIframe = document.getElementById("comments_hidden_iframe")
commentIframe.addEventListener("load", function(){submit()}, true)
function submit() {
document.getElementById("comment-content").value = ""
showSnackbar("Submitted Comment")
loadComments()
}
function checkform() {
if (firebase.auth().currentUser) {
document.getElementById("email").value = firebase.auth().currentUser.email
document.getElementById("userName").value = firebase.auth().currentUser.displayName
return true
}
alert("Authenticate with google to sign in")
return false
}
loadComments()
</script>
{% include 'firebase.njk' %}
Include the comments layout in the proper location in the post and voila! There we have it, a simple working comments section for a static site with just google sheets and forms and authentication for a static website with firebase auth.
Until next time, adiós!


There are currently no comments on this article, be the first to add one below!