 Notification toggle on a static eleventy site
While reading about cloudflare workers, I had this thought of can I use this to trigger push notifications for my static site that has a blog. That is what I did. In this post. I will describe the steps involved in creating push notifications using Firebase Cloud Messaging and Cloudflare workers. This post must not be considered as a tutorial but merely as a guide.
Cloudflare workers allows us to write serverless code that allows us to build API using the edge nodes of cloudflare. We will create an API that will allow the users of the site to subscribe/unsubscribe to new post notifications. We will also use the ability of CRON triggers to automate sending notifications.
FCM API allows us to send push messages to the clients to update them of new data and this is exactly what we will be using to send notifications when there are new posts in our static site. We will also use their library on the front-end to handle notifications.
Firebase Cloud Messaging
First we will need to add the library to our web app. They can be included using the script tags and it must be initiated. Refer to the official documentation for additional information. Make sure to create a project in firebase if you have not already done it.
index.html
.....
<script src="https://www.gstatic.com/firebasejs/8.5.0/firebase-app.js"></script>
<script src="https://www.gstatic.com/firebasejs/8.6.2/firebase-messaging.js"></script>
....
index.js
// Your web app's Firebase configuration
// For Firebase JS SDK v7.20.0 and later, measurementId is optional
var firebaseConfig = {
	/* enter your firebase project details */
}
firebase.initializeApp(firebaseConfig)
// Using a redirect.
Also create a file named "firebase-messaging-sw.js". This file will contain the service worker that will handle sending notifications when it receives data from FCM. Initialize it with the following contents. We will fill in the rest later.
firebase-messaging-sw.js
importScripts('https://www.gstatic.com/firebasejs/8.6.2/firebase-app.js')
importScripts('https://www.gstatic.com/firebasejs/8.6.2/firebase-messaging.js')

let firebaseConfig = {
	/* enter your firebase project configurations */
}
firebase.initializeApp(firebaseConfig)
const messaging = firebase.messaging()
Now that the initial setup of firebase is done in the client let us understand how FCM works. So when a client wants to show notifications, it requires the user to allow notifications on the website. Once the notification permission is avaibale, the messaging library of firebase can create a registration token for the user. This token is then shared with the server. The token can be used to send messages to specific devices or can be registed with FCM notifications to subscribe to a topic.
We will Be registering the token on a topic since, it is a common notification that we desire to all the users. So now let us add the functionality to create the registration token. The vapidKey is available in the cloud messaging tab of the project settings in firebase console.
 FCM console
index.js
...

let notificationToken
let notificationStatus = false

const getToken =  async () => {
	let token = await messaging.getToken({ '<YOUR_PUBLIC_VAPID_KEY_HERE>'})
	return token
}

const main = async () => {
	if (Notification.permission != "blocked") {
		notificationToken = await getToken()
		console.log(notificationToken)
	}
}
main()
This script will now initially check if the notification permissions are blocked, else it will trigger the firebase function to get the token. If the permissions for notification is not granted, it will request for it. It is better to trigger the getToken on the request of the user, this is just to show the process.
Now we have the FCM registration token, we can look at the FCM API. We will be needing 4 APIs to get push notifications to work. We will need an API for registering and unregistering a user to topic, an API to check the status of the user and finally and most importantly the API that will allow us to push notifications to specific topics.
The reason we need to use REST APIs and not the firebase-admin package in nodejs is because that pacakge cannot be used in cloudflare workers as it depends on certain node specific features which are not available on workers.
// FCM API

// get user status
// SERVER_KEY available in firebase cloud messaging tab
// IID Token is the firebase messaging registration token
// Return an object on success, we are interested in the "rel" key containing the topics subscribed

statusURL = "https://iid.googleapis.com/iid/info/<FCM_REGISTRATION_TOKEN>"
statusParameters = {
	headers: {"Authorization": "key=<SERVER_KEY>"},
}

// Sub user
// API_KEY is the same as SERVER_KEY
// TOPIC is the name to which we want to subscribe the user to

let suburl = "https://iid.googleapis.com/iid/v1:batchAdd"
subParameters = {
	"headers": {
		"Content-Type": "application/json",
		"Authorization": "key=<API_KEY>"},
	"body": {
  	"to": "<TOPIC>",
   	"registration_tokens": ["<FCM_REGISTRATION_TOKEN>"]
	},
	"method": "POST"
}

// unSub user
// API_KEY is the same as SERVER_KEY
// TOPIC is the name to which we want to subscribe the user to

let unsubURL = "https://iid.googleapis.com/iid/v1:batchRemove"
unsubParameters = {
	"headers": {
		"Content-Type": "application/json",
		"Authorization": "key=<API_KEY>"},
	"body": {
  	"to": "<TOPIC>",
  	"registration_tokens": ["<FCM_REGISTRATION_TOKEN>"]
	},
	"method": "POST"
}

// Send notification
// GOOGLE_OAUTH_ACCESS_TOKEN is needed

let topicNotificationURL ="https://fcm.googleapis.com/v1/projects/329859626245/messages:send"
let topicNotificationParameter = {
		body: {
			"message": {
				"data": { "body": data.title, "title": "New Post!", "image": "https://karthikganeshram.in" + data.image, "tag": data.tag, "url": "https://karthikganeshram.in" + data.url},
				"topic": "newPost"
			}
		},
		headers: {
			Authorization: "Bearer " + GOOGLE_OAUTH_ACCESS_TOKEN,
			"Content-Type": "application/json"
		},
		method: "POST"
	}
I decided to use the batch api for add and remove as I was not able to find the remove api for a single token and wanted to maintain consitency in the API. Now we can test out the commands using curl. We have everything required to test the API except the GOOGLE_OAUTH_ACCESS_TOKEN. The method to obtain it will be explained soon. In the meantime you can use the "Notifcation composer" in firebase console to send test messages after you get the registration token.
Cloudflare workers
Now it is time to move onto workers. It is assumed that the reader has some familiarity with the basics of cloudflare workers. If not don't worry, the documentation and examples will get you started. As explained earlier we will have to use REST APIs instead of the firebase-admin package as it is not compatible. Therefore we must manually retrieve the Oauth token for the google api. This excellent example from cloudflare community will get us started. Now that we are able to retrieve google Oauth tokens, we can use curl to test the apis from the command line.
Let us build the API for the in the workers that our website will use. We will have 3 rest API end points. One each for subStatus, sub and unsub. We will also add a function to send the notification. These are the 4 apis described above. We will also need to add worker secrets for SERVER_KEY and email address of service account in firebase and the private key.
index.js(cloudflare worker)
async function getToken(){
	/* Use the function provided in the example above and return the token*/
}

async function subStatus(data) {
	console.log(data.token)
	let res = await fetch("https://iid.googleapis.com/iid/info/" + data.token + "?details=true", {
		headers: { Authorization: "key=" + SERVER_KEY },
		method: "GET"
	})
	if (!res.ok) {
		return { results: "failed" }
	}
	else {
		let data = await res.json()
		return { results: "success", subStatus: (data.rel?.topics?.newPost ? true : false) }
	}
}

async function subUnsub(data, action) {
	console.log(data.token)
	let res = await fetch("https://iid.googleapis.com/iid/v1:batch" + action, {
		body: JSON.stringify({ "to": "/topics/newPost", "registration_tokens": [data.token] }),
		headers: {
			Authorization: "key=" + SERVER_KEY,
			"Content-Type": "application/json"
		},
		method: "POST"
	})
	if (!res.ok) {
		return { results: "failed" }
	}
	else {
		return { results: "success" }
	}
}

async function sendNotification(data) {
	let res = await fetch("https://fcm.googleapis.com/v1/projects/329859626245/messages:send", {
		body: JSON.stringify({
			"message": {
				"data": { "body": data.title, "title": "New Post!", "image": data.image, "tag": data.tag, "url": data.url},
				"topic": "newPost"
			}
		}),
		headers: {
			Authorization: "Bearer " + GOOGLE_OAUTH_ACCESS_TOKEN,
			"Content-Type": "application/json"
		},
		method: "POST"
	})

	if (!res.ok) {
		return { results: "failed" }
	}
	else {
		return { results: "success" }
	}
}

async function handleRequest(request) {
	console.log("here")
	let url = new URL(request.url)
	let response
	if (request.method === "POST") {
		const { headers } = request
		if (headers.get("content-type") == "application/json") {
			switch (url.pathname) {
				case "/api/notify/sub":
					response = await subUnsub((await request.json()), "Add")
					break
				case "/api/notify/unsub":
					response = await subUnsub((await request.json()), "Remove")
					break
				case "/api/notify/subStatus":
					response = await subStatus(await request.json())
					break
			}
		}
	}
	else {
		response = {results: "Invalid URL"}
	}
	return new Response(JSON.stringify(response), {
		headers: { 'content-type': 'application/json', 'Access-Control-Allow-Origin': '*', 'Access-Control-Allow-Credentials': 'true' },
	})
}

addEventListener("fetch", event => {
	const request = event.request
	if (
		request.method === "POST"
	) {
		console.log("here")
		event.respondWith(handleRequest(request))
	}
	else {
		event.respondWith(
			new Response(null, {
				status: 405,
				statusText: "Method Not Allowed",
			}),
		)
	}

})
You may notice that the sendNotificaion function is not being used. If you want to keep it simple and send the push notifications manually, you can add an api endpoint for the push notification but we will go one step further and automate it using CRON triggers so it will become clearer in just a bit. Now how do we automatically detect if the website has been updated. Well let us find out.
We need to create a new page on our website which will be a static website that will be updated with the details of the last post along with the time it was updated. We will use CRON triggers on the cloudflare worker to check periodically if there was a new post. If there is a new post we push notifications.
Now to compare if the date specified on the api is newer than the last notification, we must be able to store global variables in the worker script, that is where cloudflare kv comes in. Let us create a namespace for kv. Namespaces in cloudflare are nothing but a way to reference the objects in the worker script. Run the following command in the command line and save its output to "wrangler.toml".
wrangler kv:namespace create "NOTIFICATIONS_KV_DB"Now let us add a function to check if there is a newer post. I use github pages for my static site so I used the raw user content file from the repository as my api. The return of the API is a JSON that has the required parameters. An example response is as below.
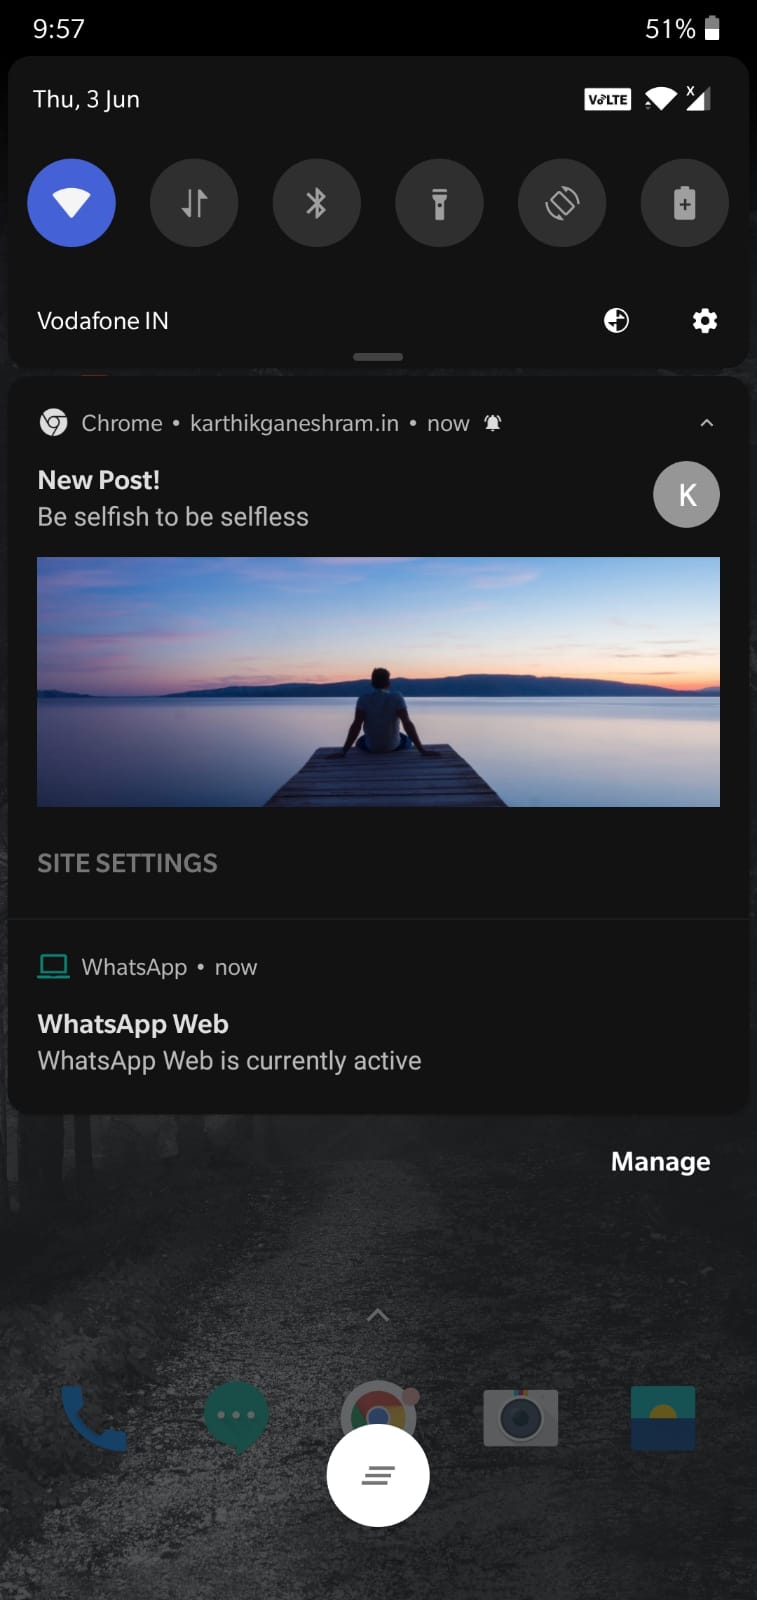
{"Date": 1623083600005,"title": "Be selfish to be selfless","url":"/blog/posts/be-selfish-to-be-selfless/", "image":"/assets/images/manInSunset.jpg", "tag": "Life"}index.js(cloudflare worker)
const setCache = data => NOTIFICATIONS_KV_DB.put("lastPostTime", data)
const getCache = () => NOTIFICATIONS_KV_DB.get("lastPostTime")

async function checkLatestPost() {
	let cache = await getCache()
	if (!cache) {
		console.log("settimg cache")
		lastBlogPost = 0
	}
	else {
		lastBlogPost = parseInt(cache)
	}
	let res = await fetch("<Static JSON API>", {
		method: "GET"
	})
	if (!res.ok) {
		return { results: "failed" }
	}
	else {
		let test = await res.text()
		console.log("succeded ", res.status, JSON.parse(test))
		let data = JSON.parse(test)
		if (lastBlogPost < data.Date) {
			let GOOGLE_OAUTH_ACCESS_TOKEN = await getToken()
			let response = await sendNotification(data)
			if (response.results === "success") {
				lastBlogPost = data.Date
				await setCache(JSON.stringify(data.Date))
			}
		}
		return { results: "success" }
	}
}

addEventListener("scheduled", event => {
	event.waitUntil(checkLatestPost(event))
})
Now create a CRON trigger using wrangler with the appropriate duration.
Eleventy Static API
Creating a static API with eleventy is rather straightforward. We just need to create a template file similar to
lastestPost.json
---
permalink: /api/latestPost.json
---
{% set latestPost = collections["post"].reverse()[0] %}
{"Date": 1623083600005,"title": "{{latestPost.data.title}}","url":"{{latestPost.url}}", "image":"{{latestPost.data.mainImage}}", "tag": "{{latestPost.data.tags[1]}}"}
Handling notifications on client
Now that we have all the parts working, We now add the functions to add/remove user from topic and also check the status of the user. I will let the process of calling them based on the action of the users upto you. we can create the event handlers to handle the notification when it arrives.
index.js
const enableNotifications = async () => {
	if (Notification.permission === "granted") {
		notificationToken = await getToken()
		subscribteTopic()
	}
	else if (Notification.permission === "blocked") {
		alert("Notification permissions have been blocked, enable notifications permission manually")
	}
	else {
		alert("Now you will be asked for notification permissions")
		notificationToken = await getToken()
		subscribteTopic()
	}
}

const subscribteTopic() => {
	subUnsub("sub")
}

const disableNotifications = async () => {
	notificationToken = await getToken()
	subUnsub("unsub")
}

const subUnsub = (action) => {
	fetch(notifyApiUrl + action, {
		body: JSON.stringify({ "token": notificationToken }),
		headers: {
			'Content-Type': 'application/json'
		},
		method: "POST"
	}).then(res => res.json()).then(data => {
		if (data.results === "success") {
			console.log("success")
			notificationStatus = (action === "sub" ? true : false)
		}
	})
}

const subStatus() {
	await fetch(notifyApiUrl + "subStatus", {
		body: JSON.stringify({ "token": notificationToken }),
		headers: { 'Content-Type': 'application/json' },
		method: "POST"
		})
		data = await res.json()
		return data
	}
}

messaging.onMessage((payload) => {
	console.log('Message received. ', payload)
}
Now finally to handling the notifications in the service worker. We create a notification object with the data that we receive from the push notification.
 Push notification on mobile
firebase-messaging-sw.js
messaging.setBackgroundMessageHandler((payload) => {
	console.log('[firebase-messaging-sw.js] Received background message ', payload);
	// Customize notification here
	const notificationTitle = payload.data.title;
	const notificationOptions = {
		body: payload.data.body,
		image: payload.data.image,
	};
	myUrl = payload.data.url;
    self.addEventListener('notificationclick', function(event) {
        event.waitUntil(self.clients.openWindow(myUrl));
        event.notification.close();
    })

	self.registration.showNotification(notificationTitle,notificationOptions);
});
And voilà, there we have working push notifications whenever there is a new post on my website. I will add some common issues you may face.
Note
- CORS error when using testing with localhost. The cloudflare example will help.
If you need any futher detail or the post is missing, please leave a comment or contact me via my email.
Until next time, turn on notification and sit tight!
There are currently no comments on this article, be the first to add one below!